Tutorial: Receive Data in Your Databricks
This tutorial will show you how to route data to a Databricks. You will:
- Create a free Databricks Workspace in case you don't have any
- Create a Delta Egress Sink
- Configure a Stream to forward data to the Egress Sink
- See data sent by your Device in Databricks
Requirements
- .NET 8.
- If you are not registered to the Spotflow IoT Platform yet, Sign Up.
- You need to have an existing Stream.
A Stream called
default-streamin Stream Groupdefault-stream-groupis created automatically after you register. Create a new one if you want to use a different Stream. - You need to have an existing Azure Storage Account to store your data. The Storage Account needs to have Hierarchical namespace enabled.
- Databricks runs on Microsoft Azure, AWS, or Google cloud. You need to have an account with one of the major cloud providers.
1. Create Databricks Workspace
You can skip this step if you already have an existing Databricks Workspace.
To give you a quick start, we've created a simple tutorial on how to create a Databricks Workspace as a 14-day free trial in Azure. For other cloud providers, it should be equally simple.
- Azure
- AWS
- GCP
Go to Azure Portal to create Databricks Workspace. Log in if you are requested to.
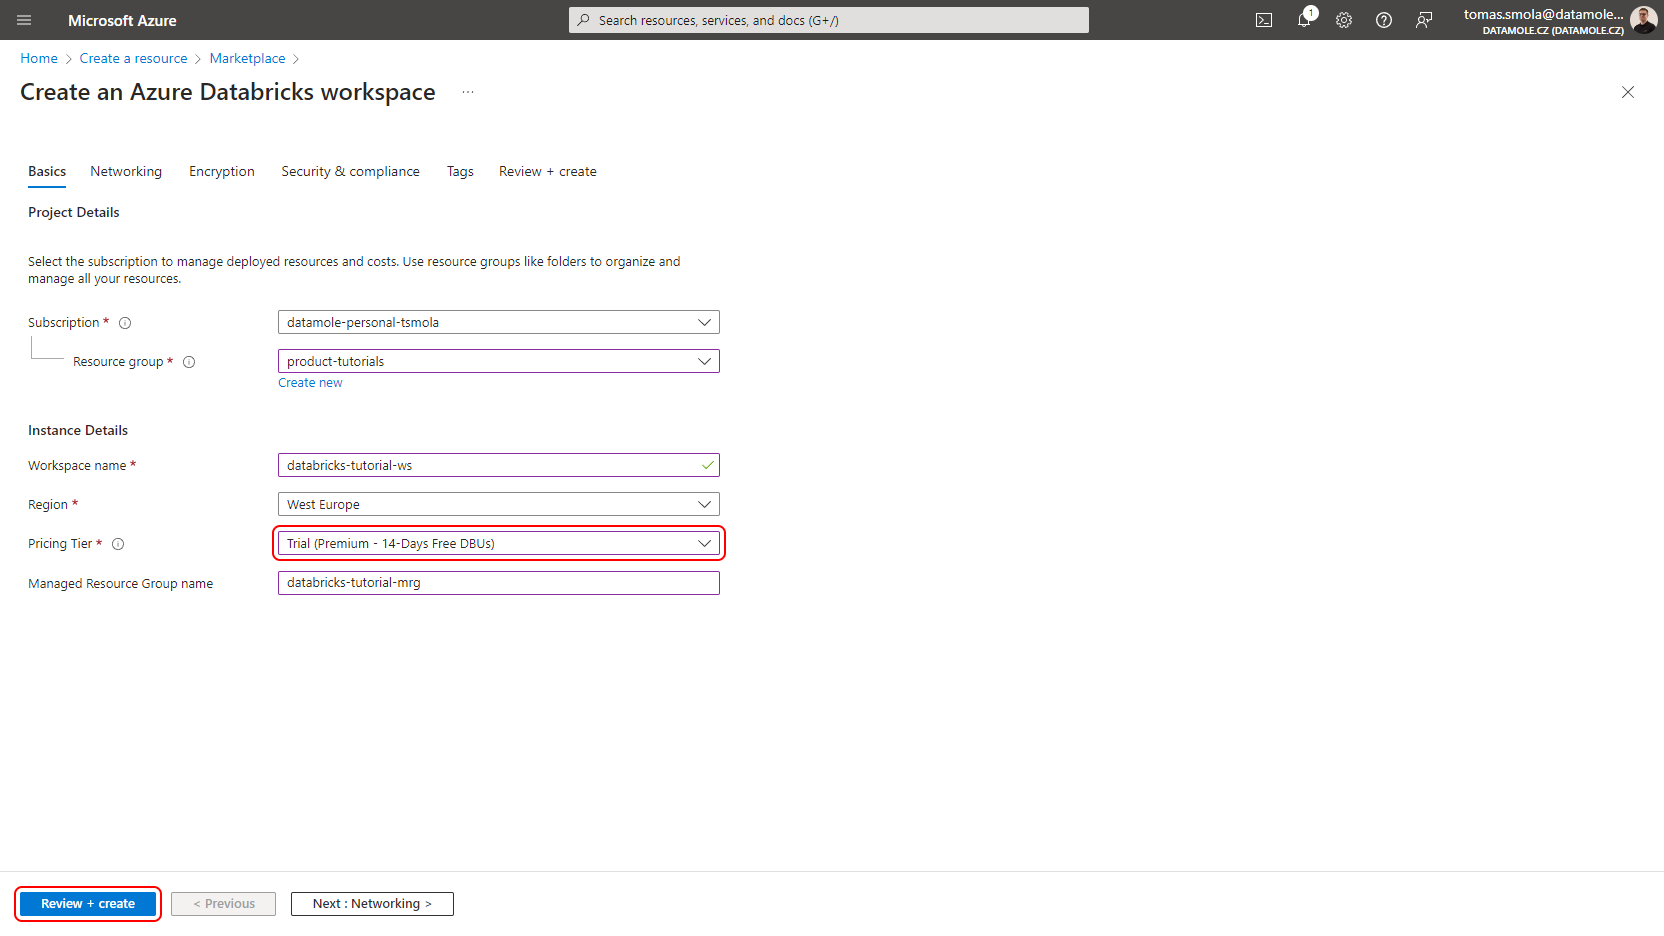
Fill in or select all fields on the Basics tab. Most importantly, select Trial (Premium - 14-Days Free DBUs) Pricing Tier to get a free trial. Click Review + create.
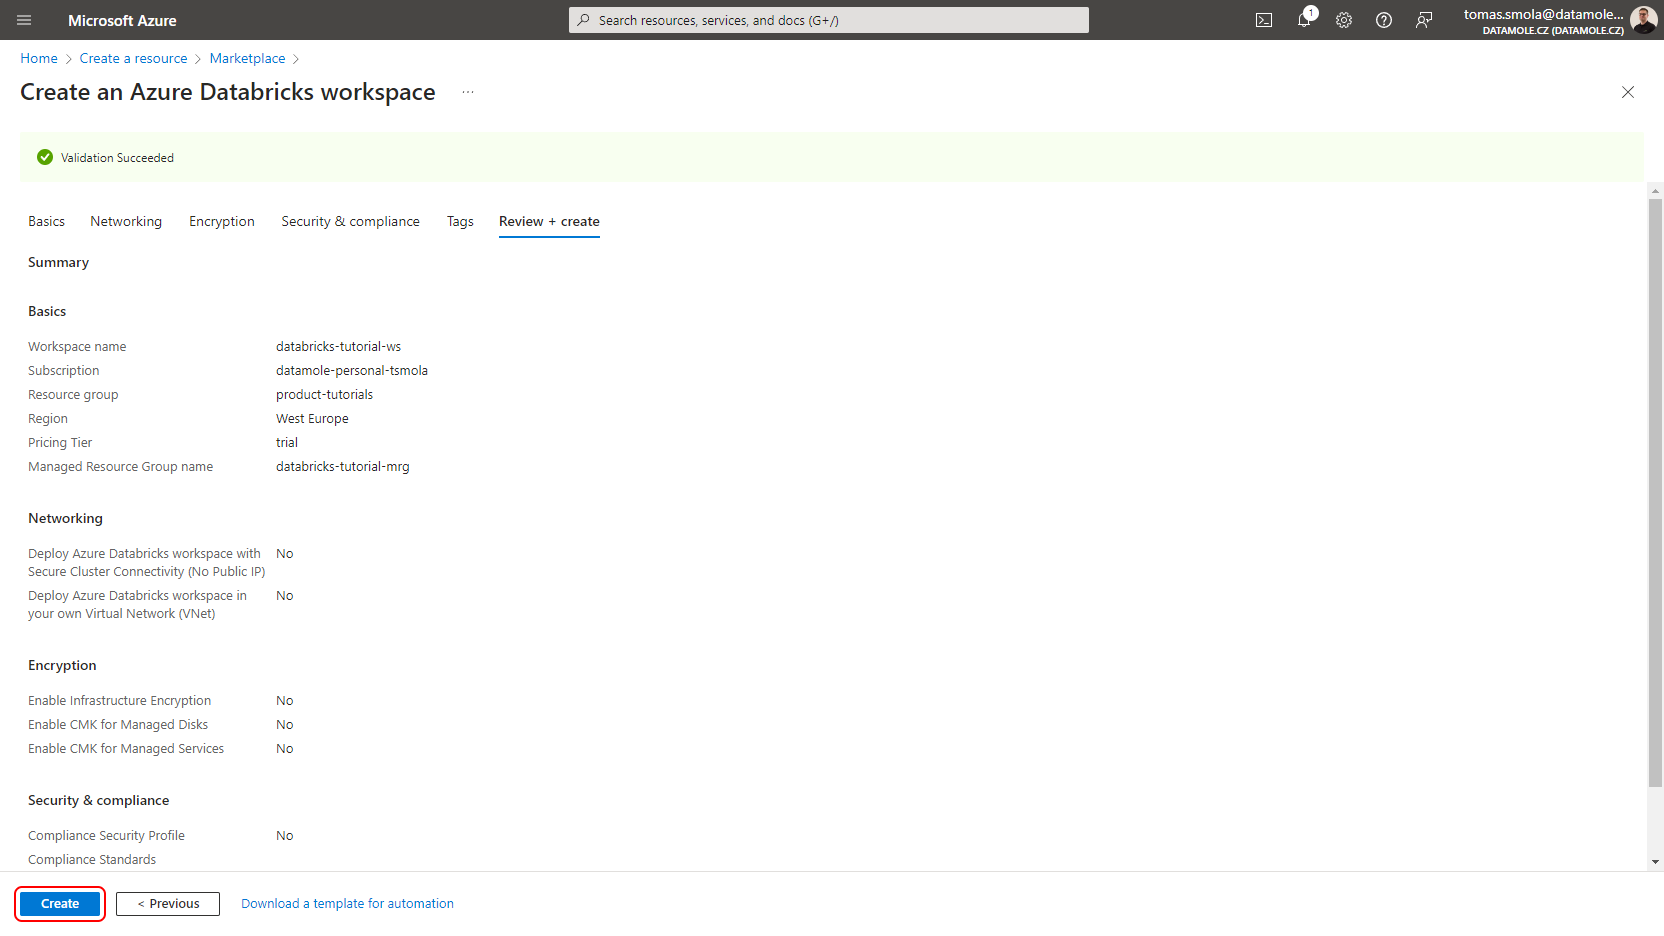
If the validation succeeds, click Create.
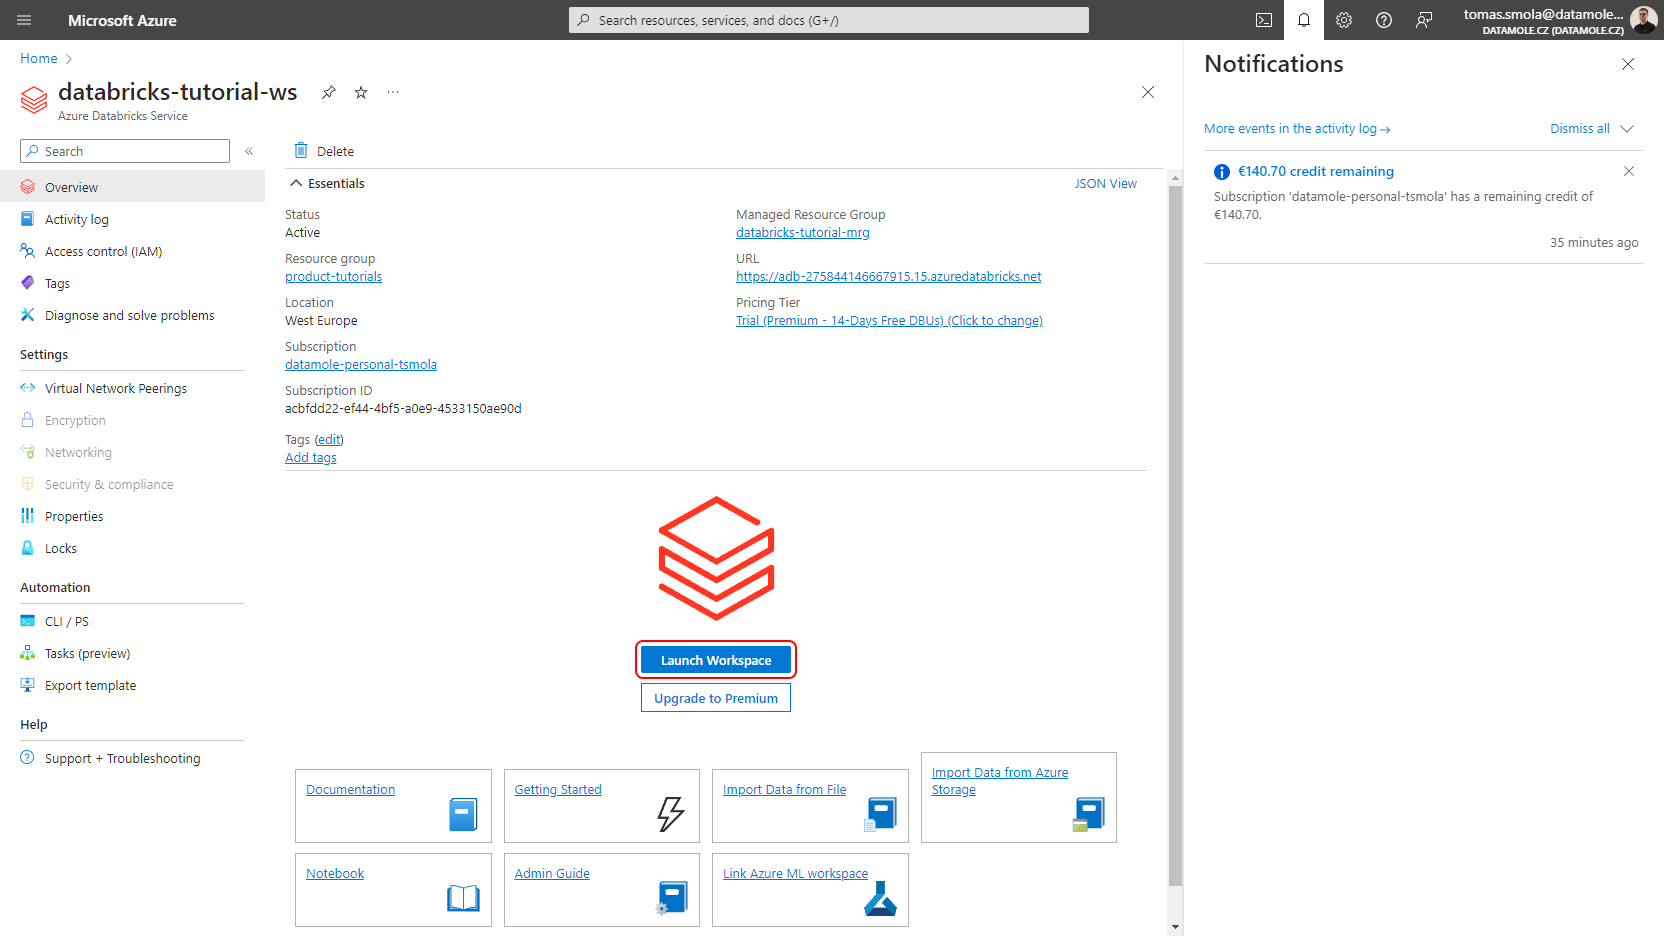
After the Databricks Workspace is created, open it in Azure Portal and click Launch Workspace on the Overview page.
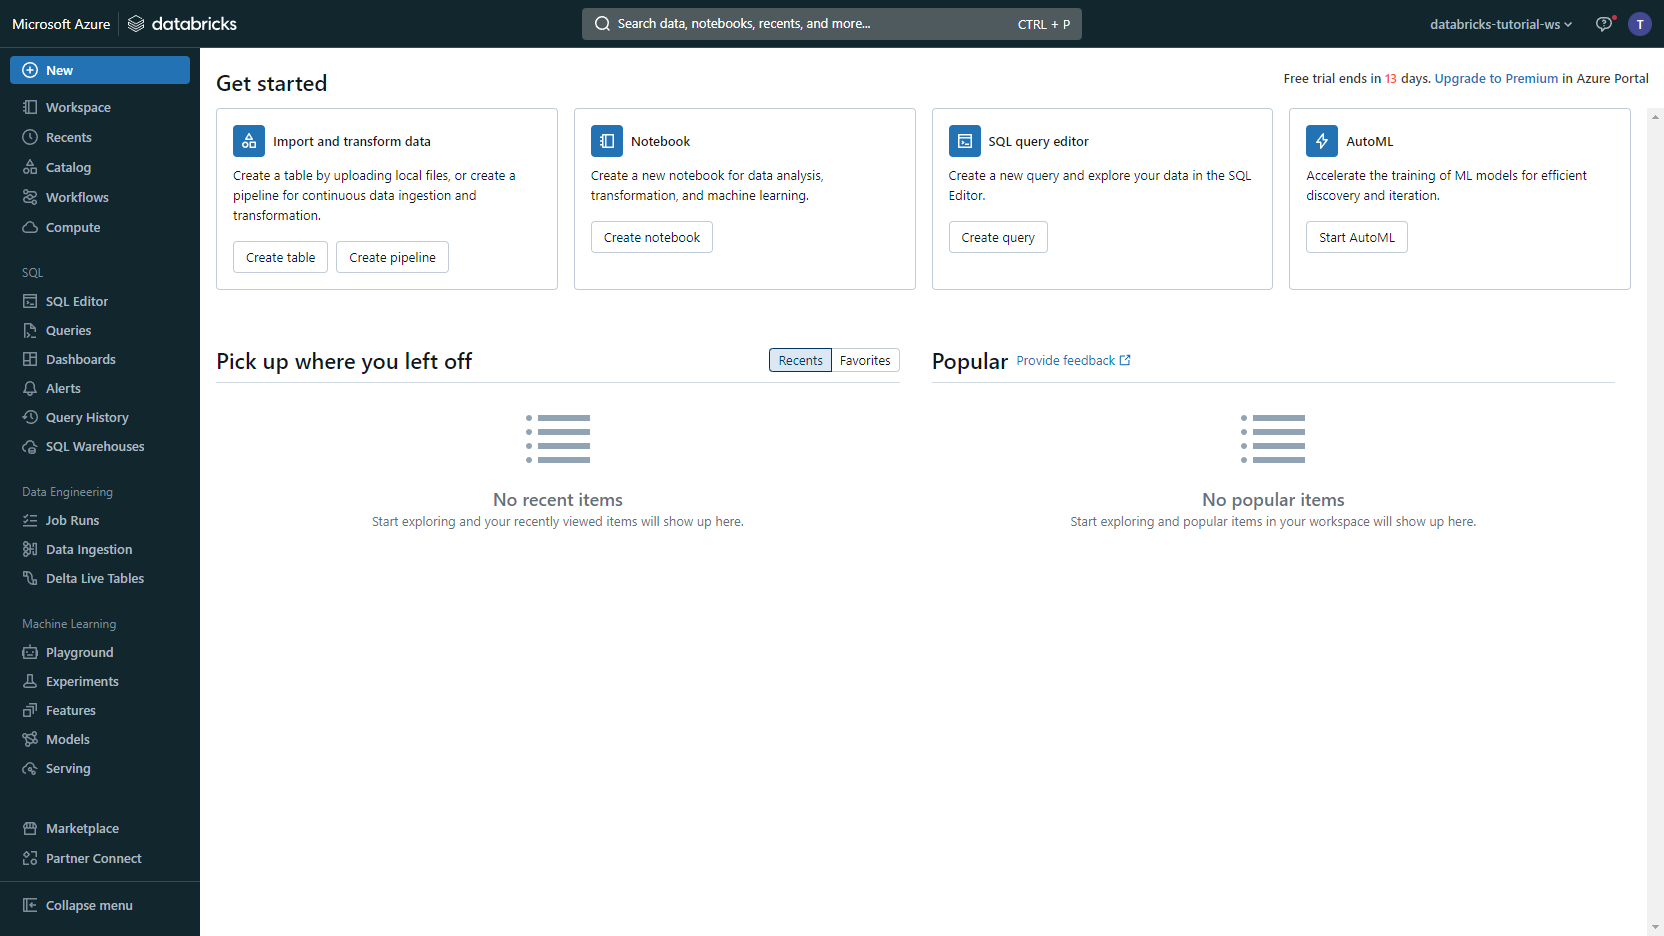
The Databricks web interface opens. Let's put that aside for a moment and get down to configuring the Spotflow IoT Platform to route data to your Databricks Workspace.
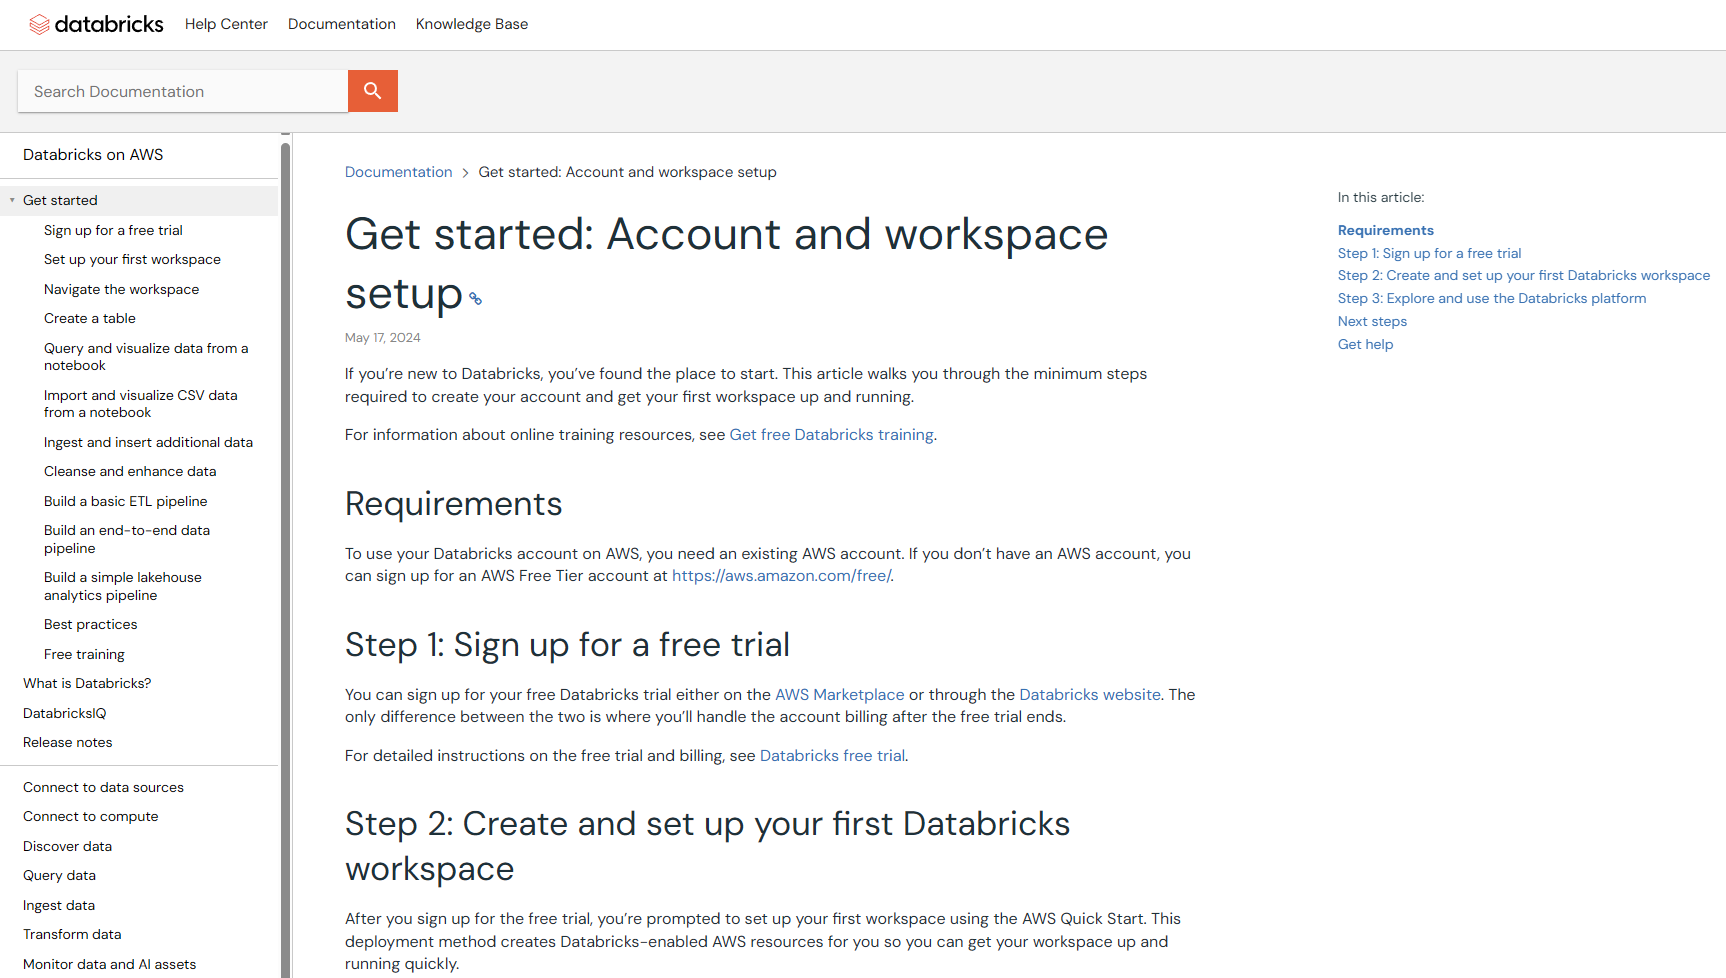
Databricks on AWS is available in the AWS Marketplace. Please see Databricks' tutorial for AWS for details.
Follow Databricks' tutorial for AWS to create Databricks Workspace in AWS.
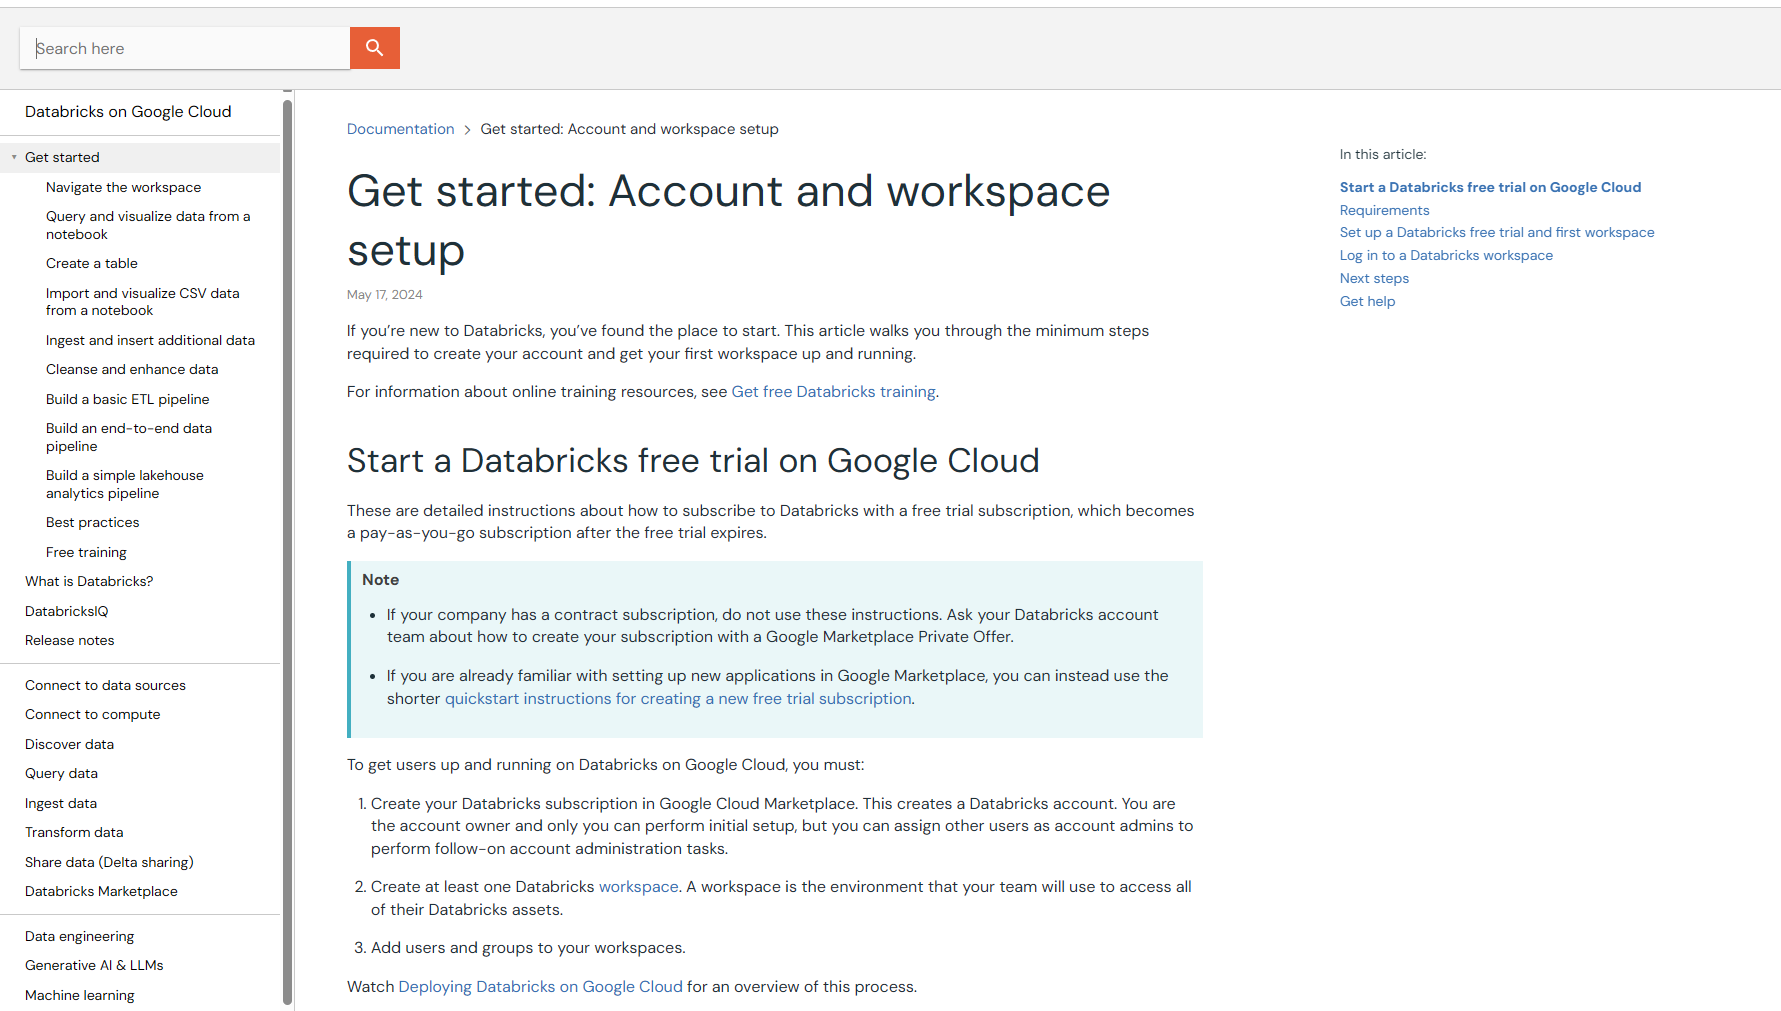
Databricks on GCP is available in the GCP Marketplace. Please see Databricks' tutorial for GCP for details.
Follow Databricks' tutorial for GCP to create Databricks Workspace in GCP.
2. Route Data to a new Delta Egress Sink
A Delta Egress Sink represents an existing Storage Account to which the Platform can forward data. Let's create a new one and configure a stream to forward data to it.
Currently, creating a Delta Egress sink requires Azure Storage Connection String which is a compact representation of identifier of the target account and access key. For help on how to get the connection string, see this Azure guide.
- Portal
- CLI
- API
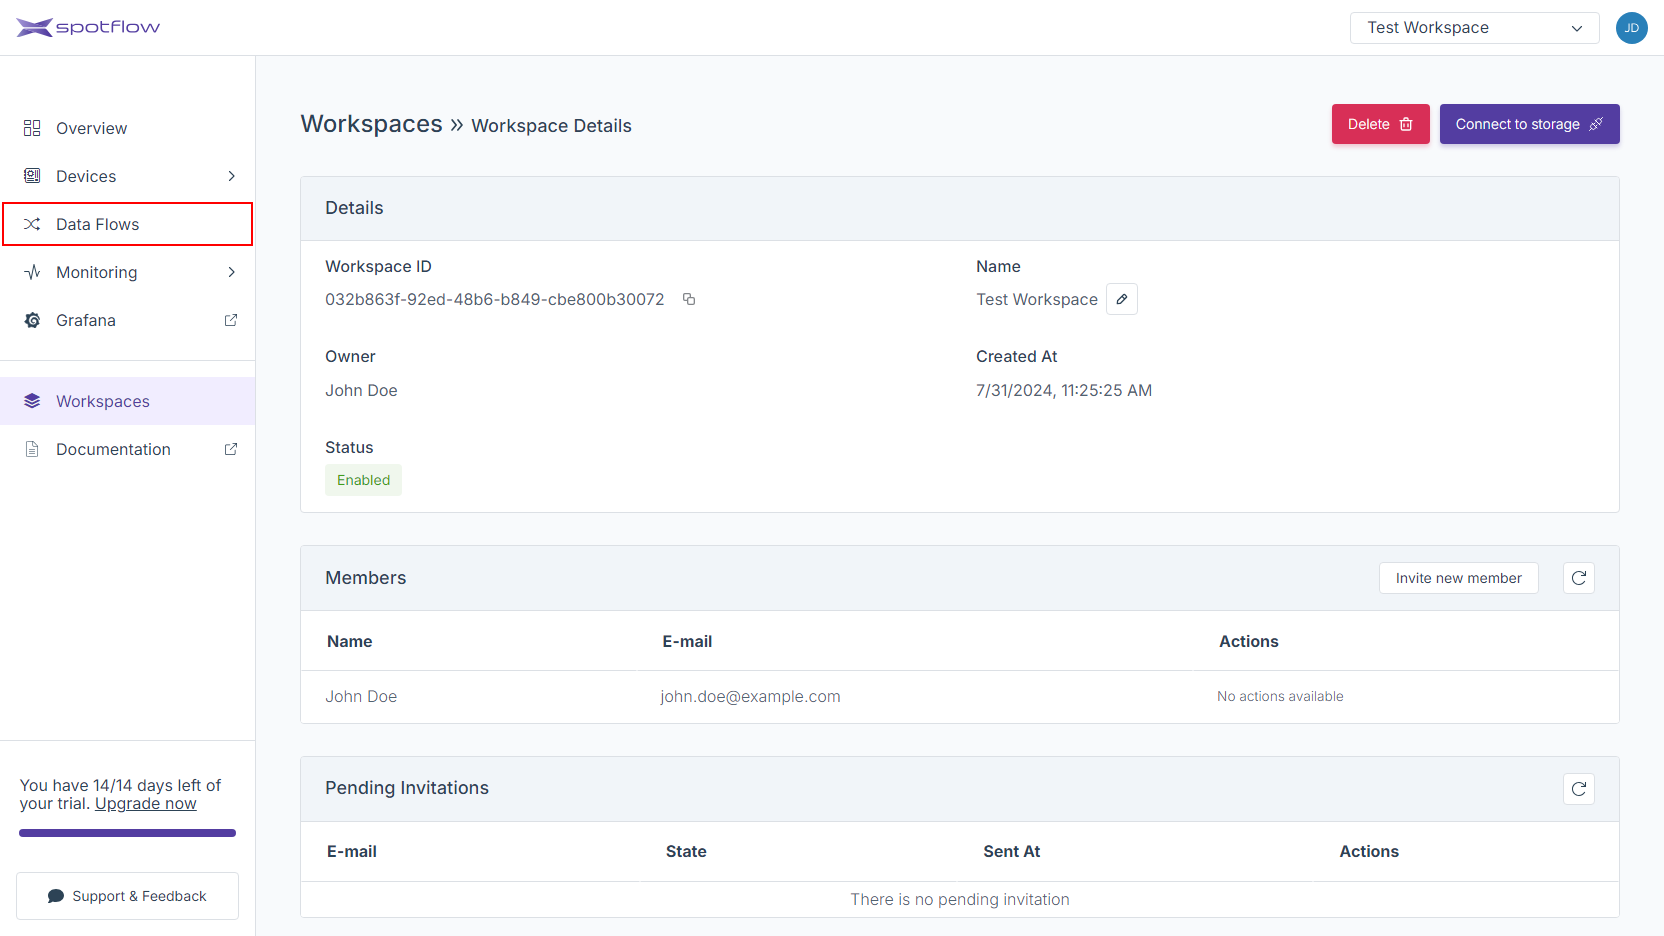
Click on Data Flows in the left sidebar.
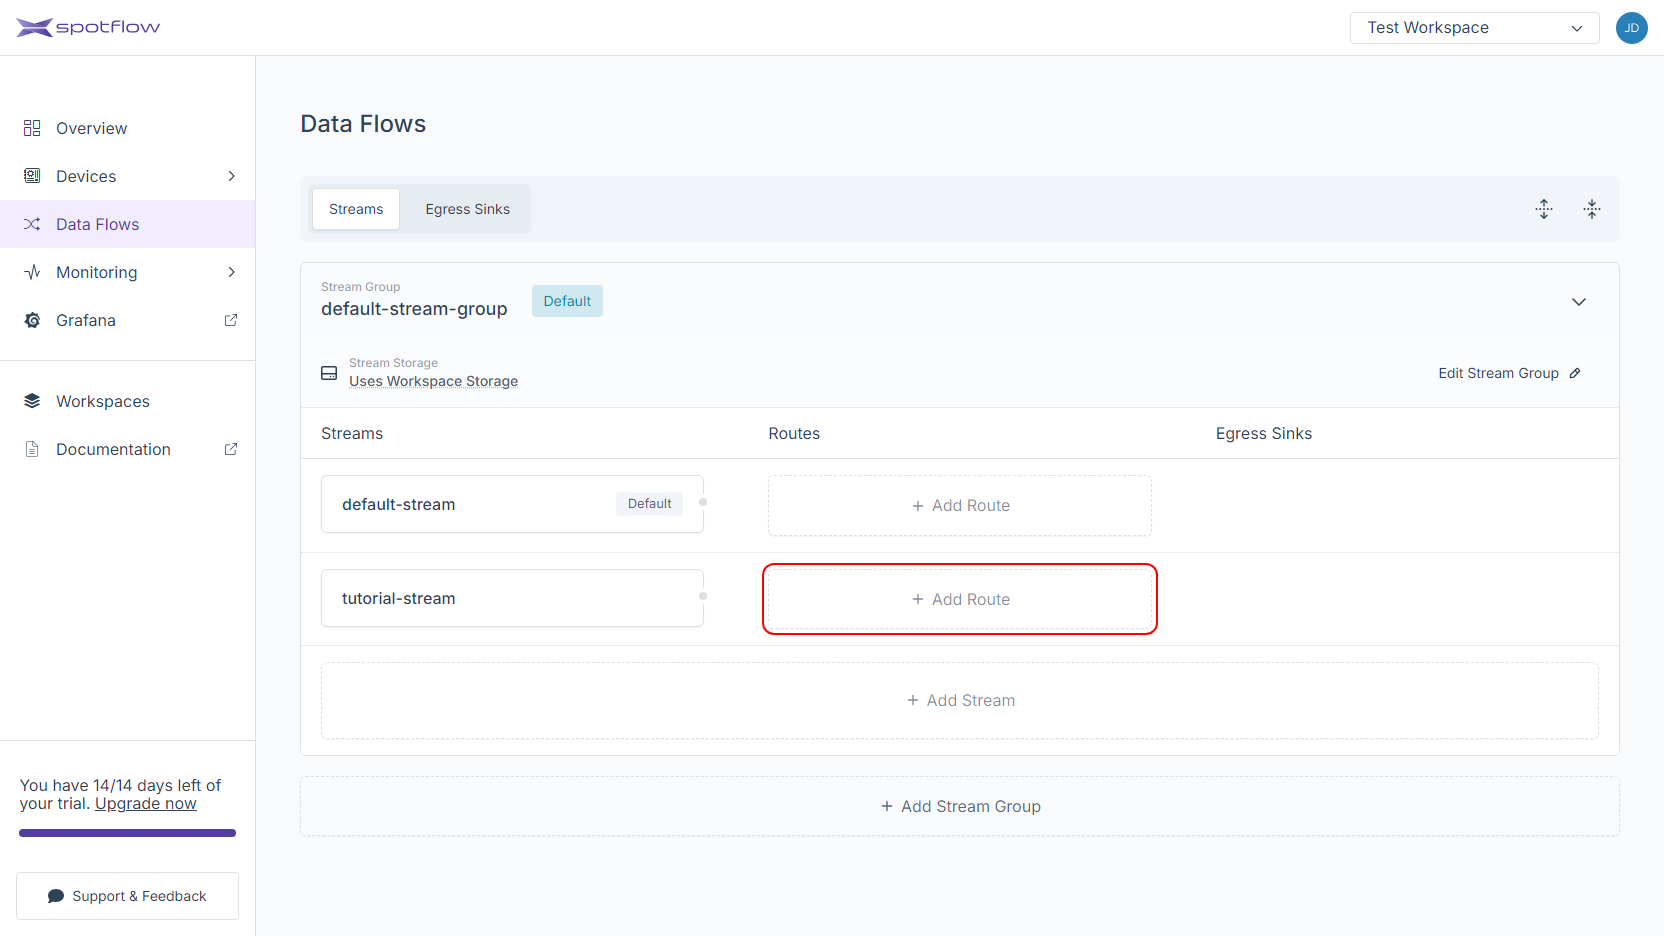
Click on the Add Route button next to the stream that should be routed to the Delta Egress Sink.
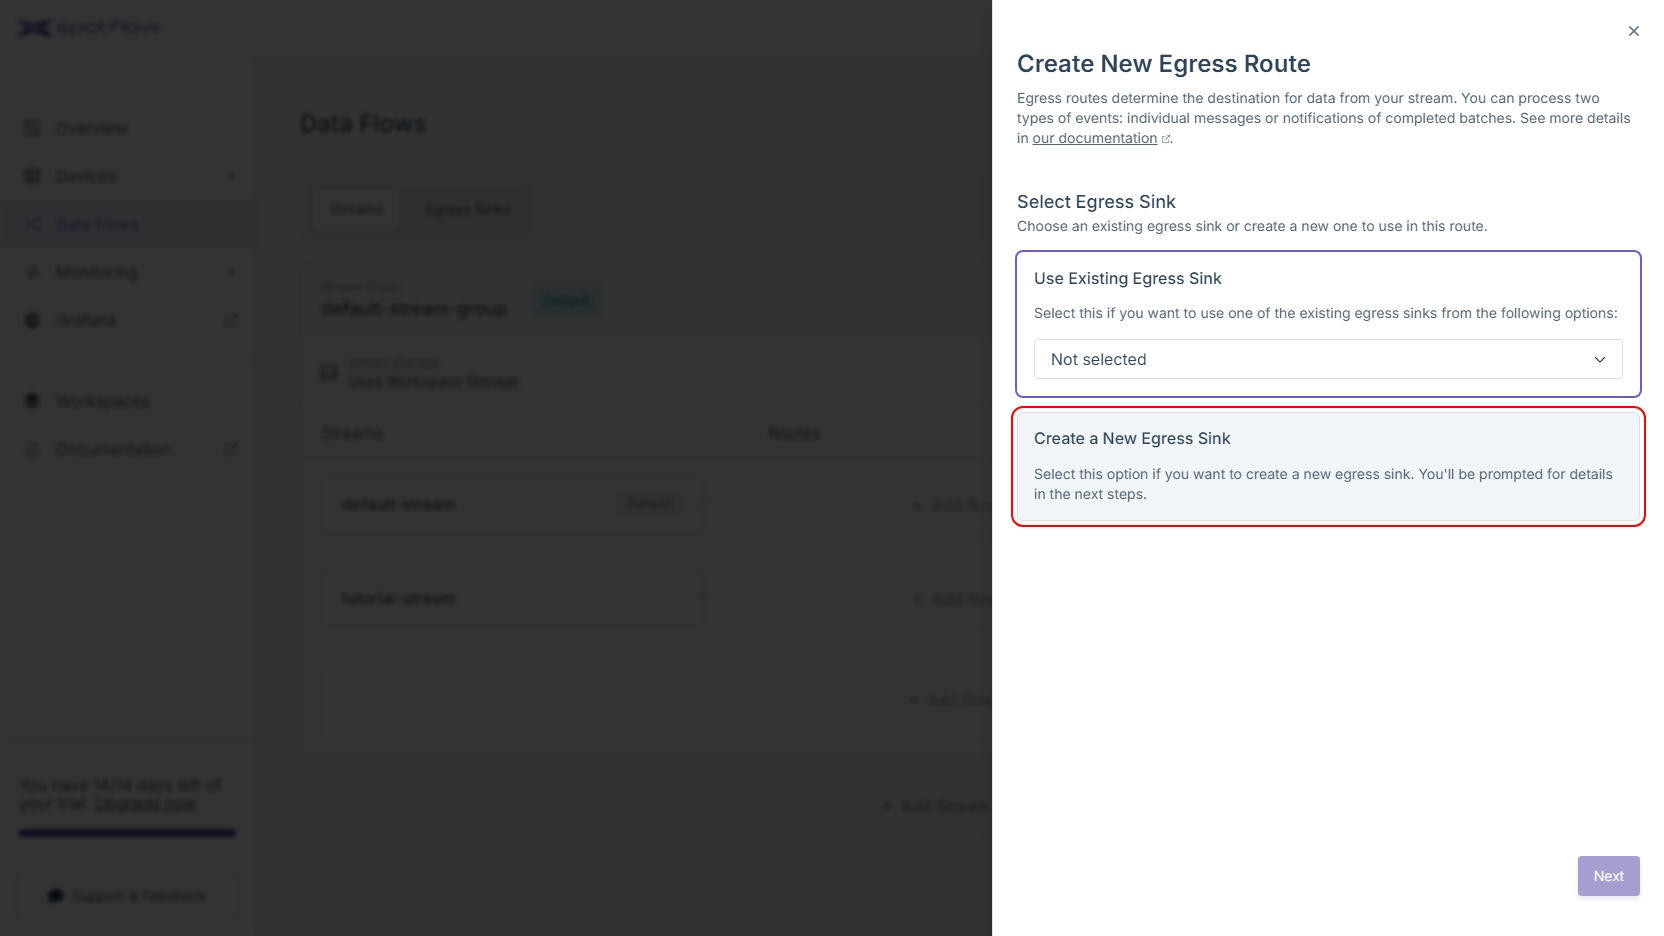
Choose the Create a New Egress Sink option and click on the Next button.
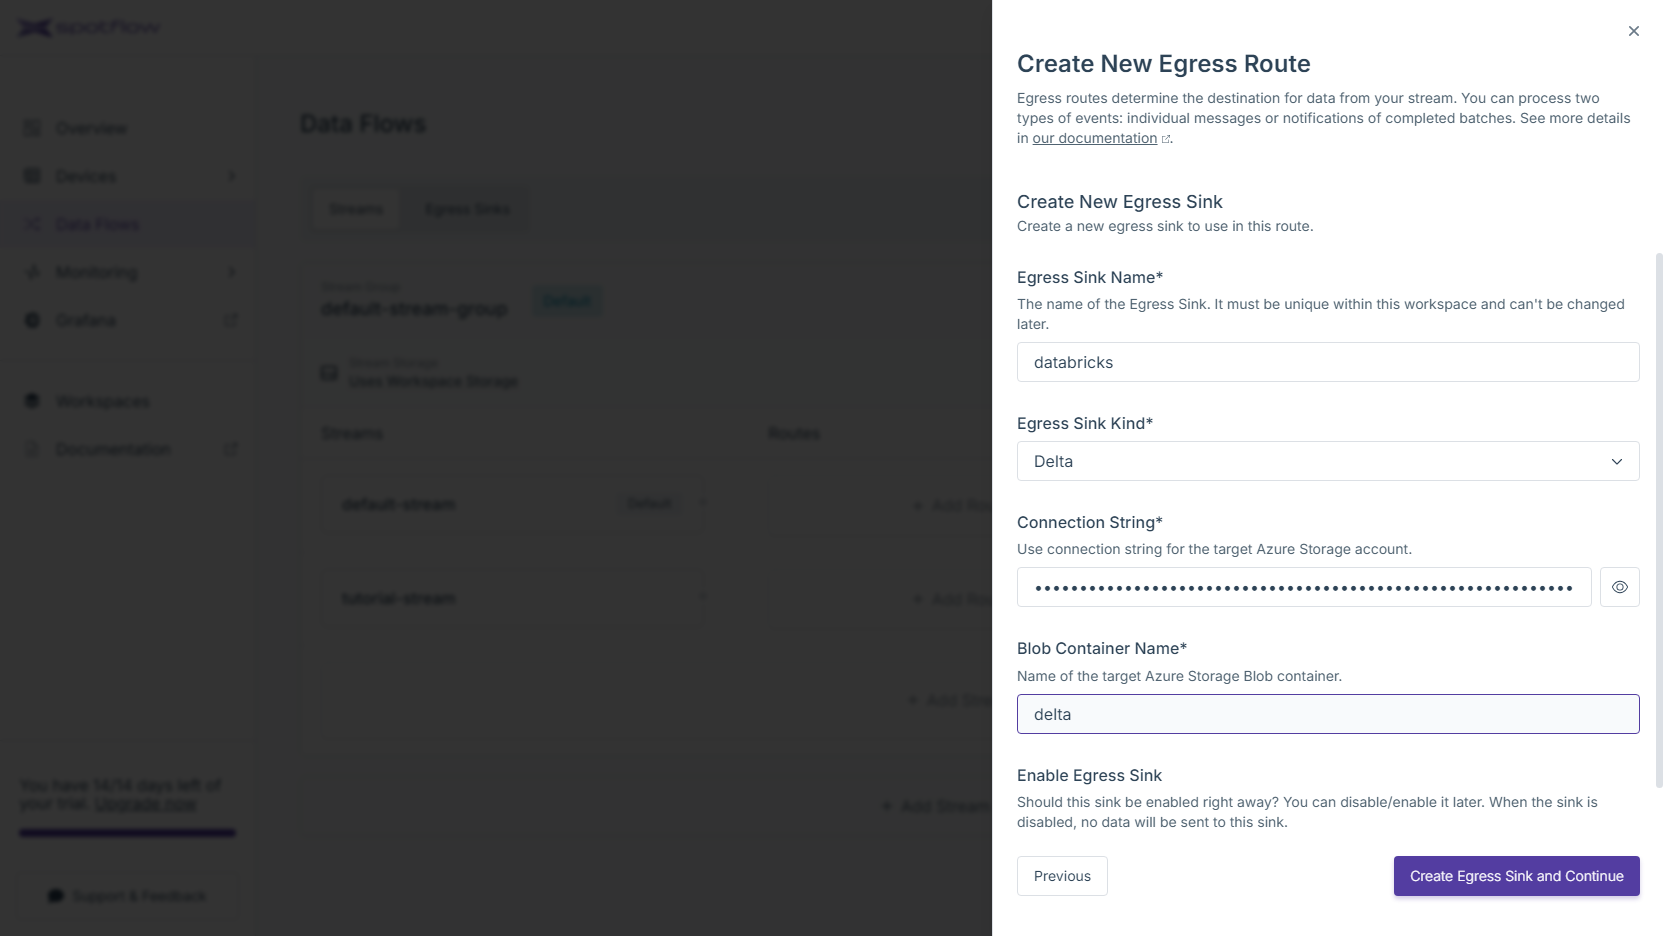
Fill the name of the Egress Sink, e.g.
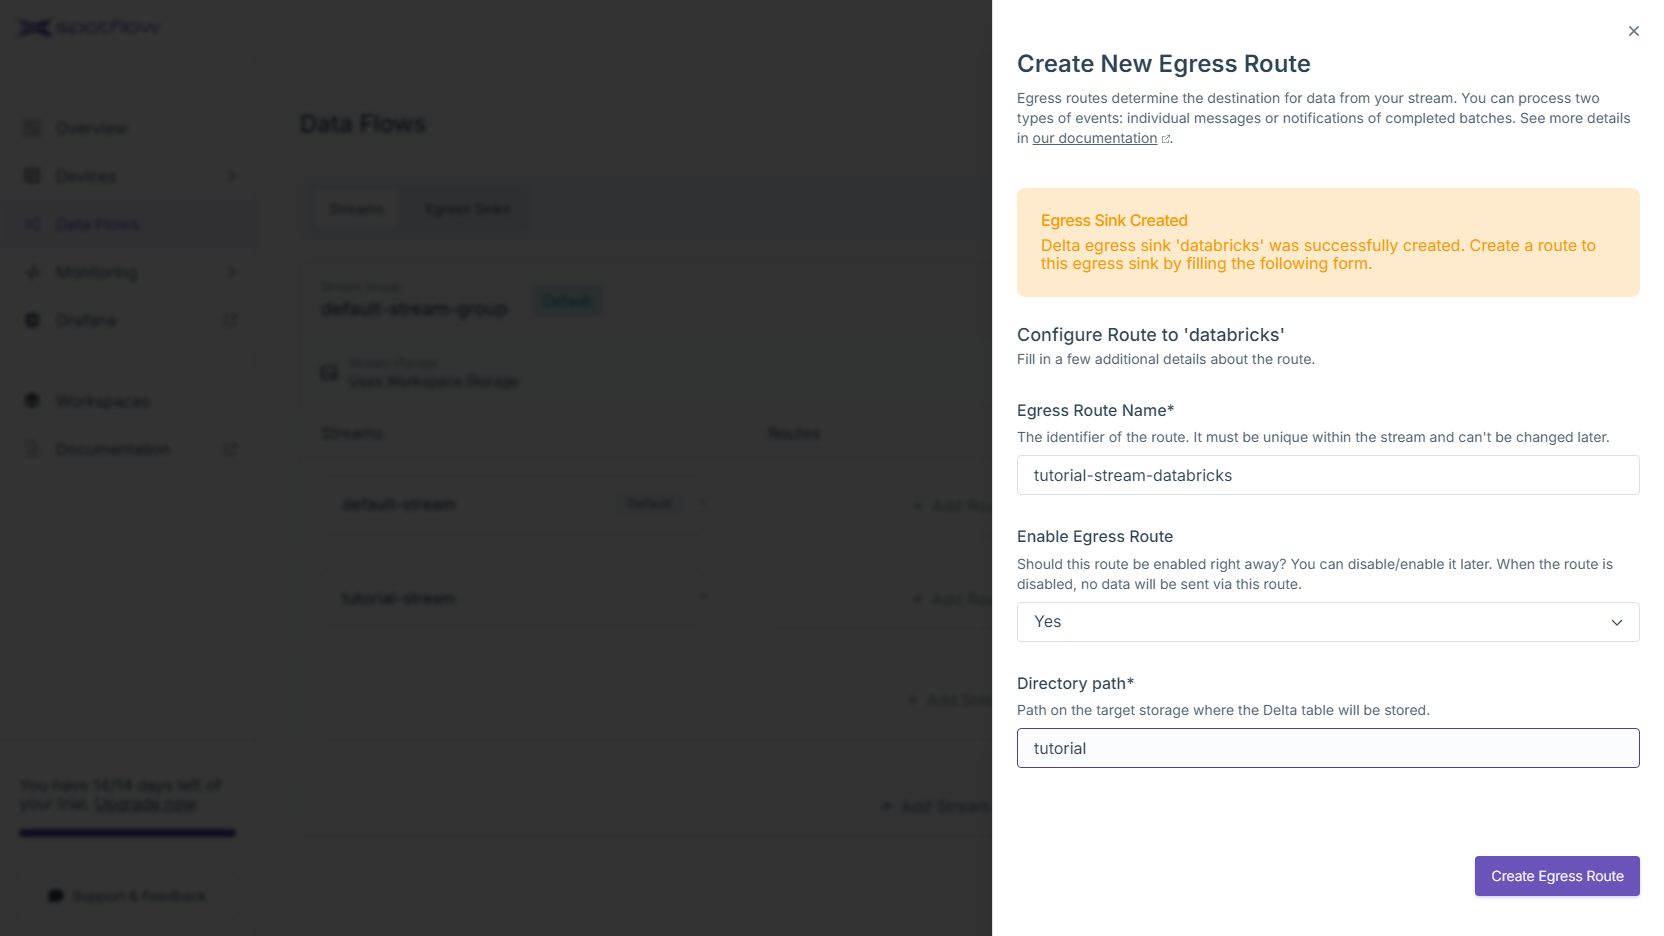
databricks. SelectDeltaas the egress sink kind. To configure the connection, you need to provide a connection string to the Azure Storage Account and a name of a container. Click Create Egress Sink and Continue.The new Delta Egress Sink is now created! At this point, it is only needed to create an egress route so the data from your stream are forwarded to this sink. Review the default configuration and optionally customize it. Configure the path where the we should store the Delta table. Click Create Egress Route to finish.
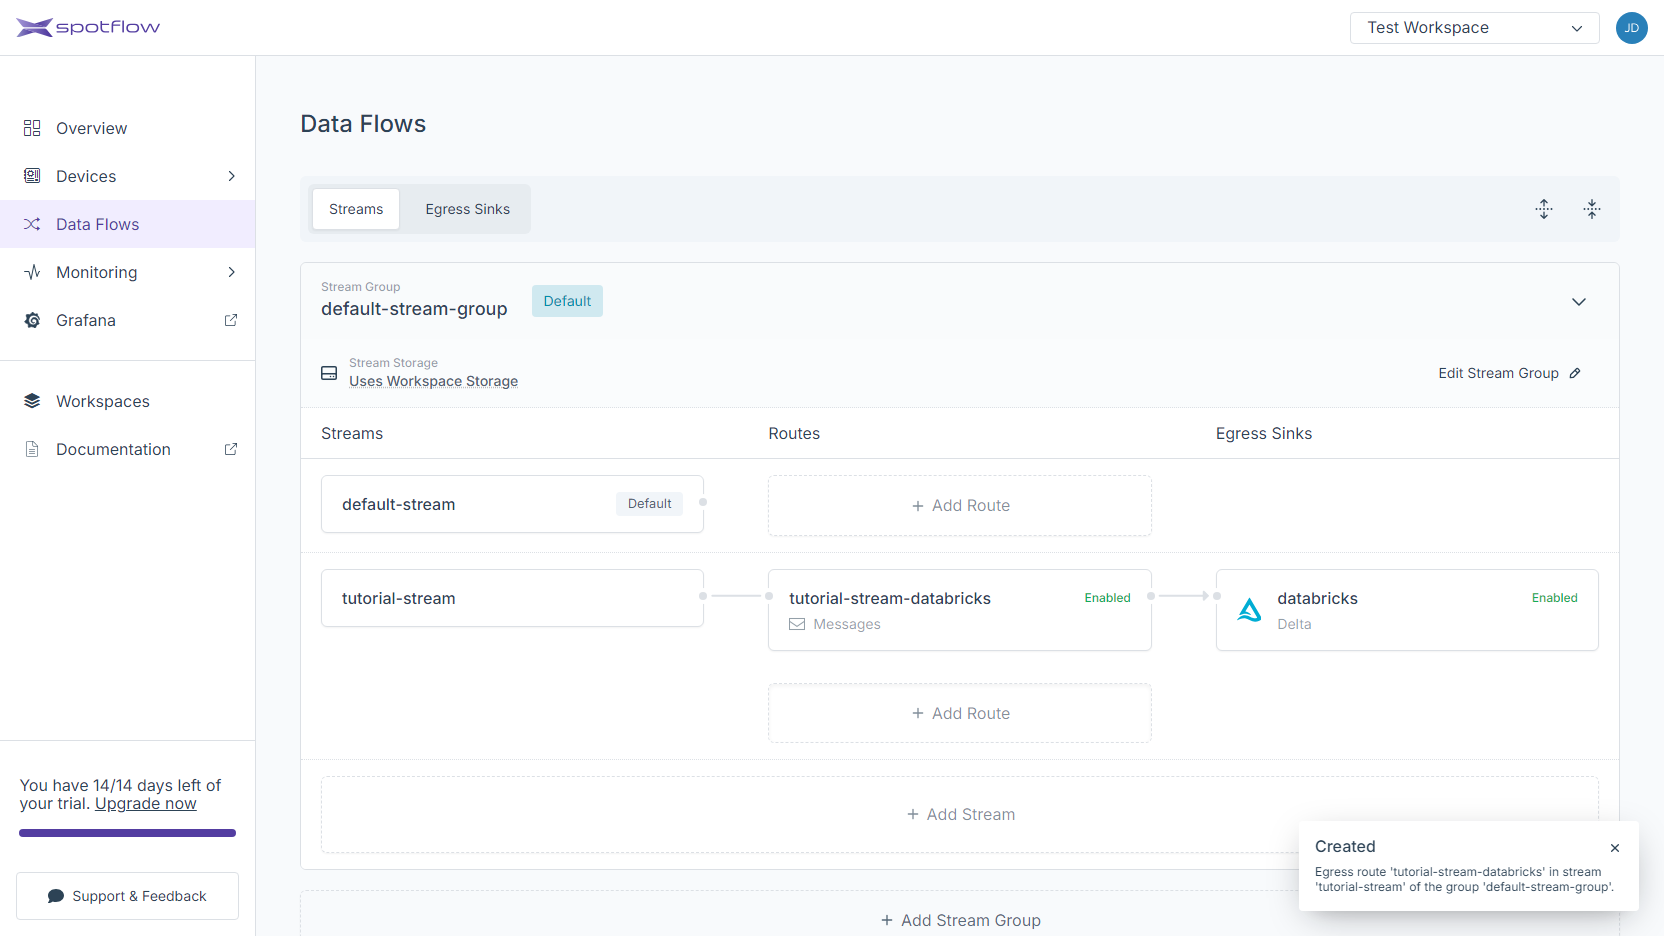
The route to the new Delta Egress Sink has been created! You should see an arrow going from your stream to the Egress Sink.
Create Delta Egress Sink
Supposing you have already installed the CLI and logged in, replace the placeholders <Your Egress Sink Name>, <Your Storage Account Connection String> and <Your Blob Container Name> with your Delta Egress Sink name, your Storage Account connection string, and your Blob Container name and run the following command to create a new Delta Egress Sink:
spotf egress-sink cu delta azure-blob --name <Your Egress Sink Name> --connection-string "<Your Storage Account Connection String>" --container-name <Your Blob Container Name>
The CLI will confirm the creation and display the Delta Egress Sink details:
info: Spotflow.IotPlatform.Cli.App.Commands.DataFlows.EgressSinks.EgressSinkCreateOrUpdateDeltaAzureBlobCommand[0]
      Egress Sink 'my-delta-egress-sink' created.
Name           :  my-delta-egress-sink
WorkspaceId    :  e618a6ff-5ee3-41c7-b2a2-ceae374afb2d
IngressVersion :  V2
Properties     :
  IsEnabled :  true
  Config    :
    Delta           :
      AzureBlobStorage :
        BlobServiceUri     :  https://databrickstutorialsa.blob.core.windows.net/
        StorageAccountName :  databrickstutorialsa
        ContainerName      :  delta-tables
Create Route to the Egress Sink
spotf stream route create-or-update delta --stream-group-name <Your Stream Group Name> --stream-name <Your Stream Name> --egress-route-name <Your Egress Route Name> --directory-path <Your Directory Path> --egress-sink-name <Your Egress Sink Name>
The CLI will confirm the creation and display the Egress Route details:
info: Spotflow.IotPlatform.Cli.App.Commands.DataFlows.Streams.EgressRoutes.StreamEgressRouteCreateOrUpdateDeltaCommand[0]
      Egress Route 'route-to-delta' for Stream 'my-new-stream' in Stream Group 'my-new-stream-group' created successfully.
Name            :  route-to-delta
WorkspaceId     :  e618a6ff-5ee3-41c7-b2a2-ceae374afb2d
StreamGroupName :  my-new-stream-group
StreamName      :  my-new-stream
Properties      :
  IsEnabled      :  true
  EgressSinkName :  my-delta-egress-sink
  Config         :
    Delta           :
      DirectoryPath :  example/table-1
  Input          :  Messages
The following instructions expect that you have already obtained the API access token from the Portal and that you know the Workspace ID.
Create Delta Egress Sink
Replace the placeholders with your Delta Egress Sink name, your Storage Account connection string, and your Blob Container name and run the following command to create a new Delta Egress Sink
Replace the placeholders <Your Workspace ID>, <Your Egress Sink Name>, <Your Storage Account Connection String> and <Your Blob Container Name> with your Workspace ID, your Delta Egress Sink name, your Storage Account connection string, and your Blob Container name and run the following command to create a new Delta Egress Sink:
- cURL
- PowerShell
curl -L -X PATCH 'https://api.eu1.spotflow.io/workspaces/<Your Workspace ID>/egress-sinks/<Your Egress Sink Name>' \
-H 'Content-Type: application/json' \
-H 'Accept: application/json' \
-H 'Authorization: Bearer <Your API Access Token>' \
--data-raw '{
  "properties": {
    "isEnabled": true,
    "config": {
      "delta": {
        "azureBlobStorage": {
          "connectionString": "<Your Storage Account Connection String>",
          "containerName": "<Your Blob Container Name>"
        }
      }
    }
  }
}'
Create Route to the Egress Sink
(Invoke-WebRequest -Method Patch -Uri 'https://api.eu1.spotflow.io/workspaces/<Your Workspace ID>/egress-sinks/<Your Egress Sink Name>' `
 -Headers @{
   'Content-Type' = 'application/json'
   'Accept' = 'application/json'
   'Authorization' = 'Bearer <Your API Access Token>'
 } `
 -Body '{ "properties": { "isEnabled": true, "config": { "delta": { "azureBlobStorage": { "connectionString": ""<Your Storage Account Connection String>", "containerName": "<Your Blob Container Name>" }}}}}').Content
The API will confirm the creation and display the Delta Egress Sink details:
{
    "name": "my-delta-egress-sink",
    "workspaceId": "e618a6ff-5ee3-41c7-b2a2-ceae374afb2d",
    "ingressVersion": "V2",
    "version": 0,
    "properties": {
        "isEnabled": true,
        "config": {
            "delta": {
                "azureBlobStorage": {
                    "blobServiceUri": "https://databrickstutorialsa.blob.core.windows.net/",
                    "storageAccountName": "databrickstutorialsa",
                    "containerName": "delta-tables"
                }
            }
        },
        "protocolVersion": "V2"
    }
}
Create Route to the Egress Sink
Replace the placeholders <Your Workspace ID>, <Your Stream Group Name>, <Your Stream Name>, <Your Egress Route Name>, <Your API Access Token> and <Your Event Hub Egress Sink Name> with your Workspace ID, your Stream Group name, your Stream name, API access token and your Event Hub Egress Sink name and run the following command to create a new Egress Route for Stream:
- cURL
- PowerShell
curl -L -X PATCH 'https://api.eu1.spotflow.io/workspaces/<Your Workspace ID>/stream-groups/<Your Stream Group Name>/streams/<Your Stream Name>/egress-routes/<Your Egress Route Name>' \
-H 'Content-Type: application/json' \
-H 'Accept: application/json' \
-H 'Authorization: Bearer <Your API Access Token>' \
--data-raw '{
  "properties": {
    "isEnabled": true,
    "egressSinkName": "<Your Event Hub Egress Sink Name>",
    "config": {
      "delta": {
        "directoryPath": "<Your Directory Path>"
      }
    },
    "input": "Messages"
  }
}'
(Invoke-WebRequest -Method Patch -Uri 'https://api.eu1.spotflow.io/workspaces/<Your Workspace ID>/stream-groups/<Your Stream Group Name>/streams/<Your Stream Name>/egress-routes/<Your Egress Route Name>' `
-Headers @{
  'Content-Type' = 'application/json'
  'Accept' = 'application/json'
  'Authorization' = 'Bearer <Your API Access Token>'
} `
-Body '{ "properties": { "isEnabled": true, "egressSinkName": "<Your Event Hub Egress Sink Name>", "config": { "delta": { "directoryPath": "<Your Directory Path>" }}, "input": "Messages" }}').Content
The API will confirm the creation and display the Egress Route details:
{
    "name": "route-to-delta",
    "workspaceId": "e618a6ff-5ee3-41c7-b2a2-ceae374afb2d",
    "streamGroupName": "my-new-stream-group",
    "streamName": "my-new-stream",
    "version": 0,
    "properties": {
        "isEnabled": true,
        "egressSinkName": "my-delta-egress-sink",
        "config": {
            "delta": {
                "directoryPath": "example/table-1"
            }
        },
        "input": "Messages"
    }
}
3. Send Data to Platform
Follow Tutorial: Send Data to Platform to send data to the Platform.
Do not forget to send data to the Stream you configured in step 2!
If you successfully followed the previous steps, your Device is sending data to the Platform and the data is forwarded to the delta table in your Storage Account. Now you are ready to consume the data.
4. See Data Sent by Your Device in Databricks
Now, you'll create a notebook in Databricks. Our example uses Python & PySpark, but you can use different languages if needed:
# Prepare information about the target Delta Table

storage_account_name = "<Your Stroage Account Name>"
sas_token = "<Your SAS Token For Your Container>"
container_name = "<Your Container Name>"
directory_path = "<Your Delta Table Directory Path>"

# Configure PySpark

spark.conf.set(f"fs.azure.account.auth.type.{storage_account_name}.dfs.core.windows.net", "SAS")
spark.conf.set(f"fs.azure.sas.token.provider.type.{storage_account_name}.dfs.core.windows.net", "org.apache.hadoop.fs.azurebfs.sas.FixedSASTokenProvider")
spark.conf.set(f"fs.azure.sas.fixed.token.{storage_account_name}.dfs.core.windows.net", sas_token)

# Load the Delta Table as a PySpark data frame

df = spark.read.format("delta").load(f"abfss://{container_name}@{storage_account_name}.dfs.core.windows.net/{directory_path}")

# Transform the data frame (e.g. sort)

df_sorted = df.sort("ingress_enqueued_date_time")

# Check the result

df.toPandas()
How to get the SAS token
The service-level SAS or container-level SAS can be used. If using service-level SAS, Container and Object resource types must be allowed. In both cases it is necessary to grant Read and List permissions.
The SAS token can be generated using
Azure CLI,
Azure Portal,
Azure SDK,
or manually.
Now, go back to your Databricks Workspace (launch it from the Azure Portal) and follow these steps to create a notebook and query your data:
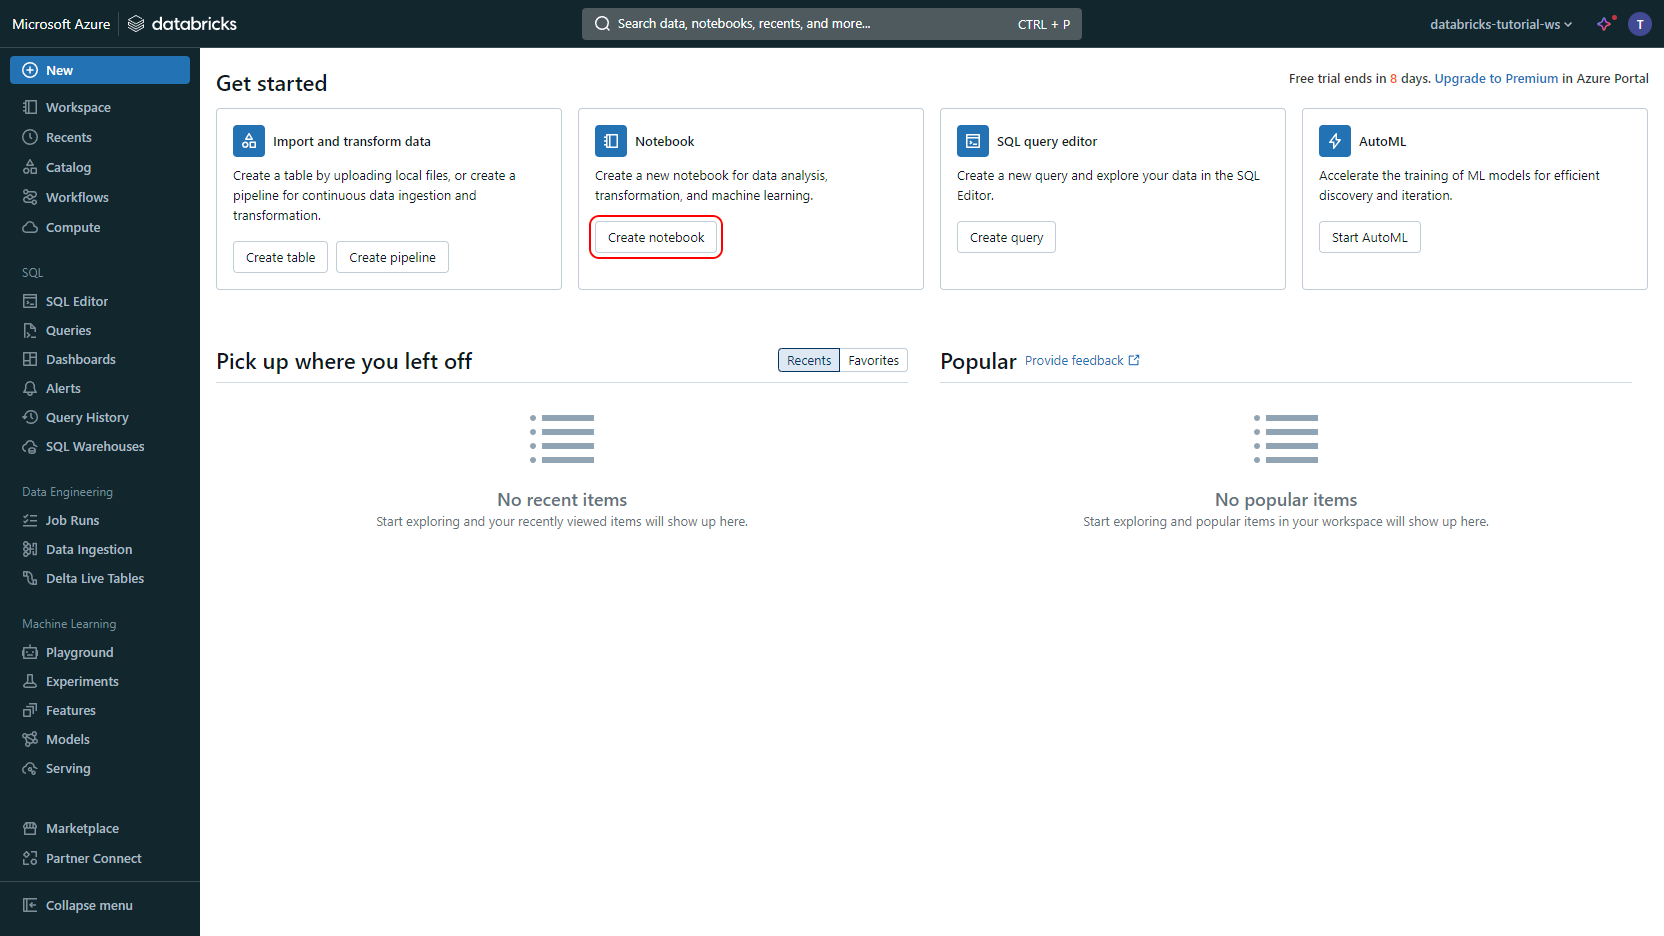
In Databricks, click Create notebook
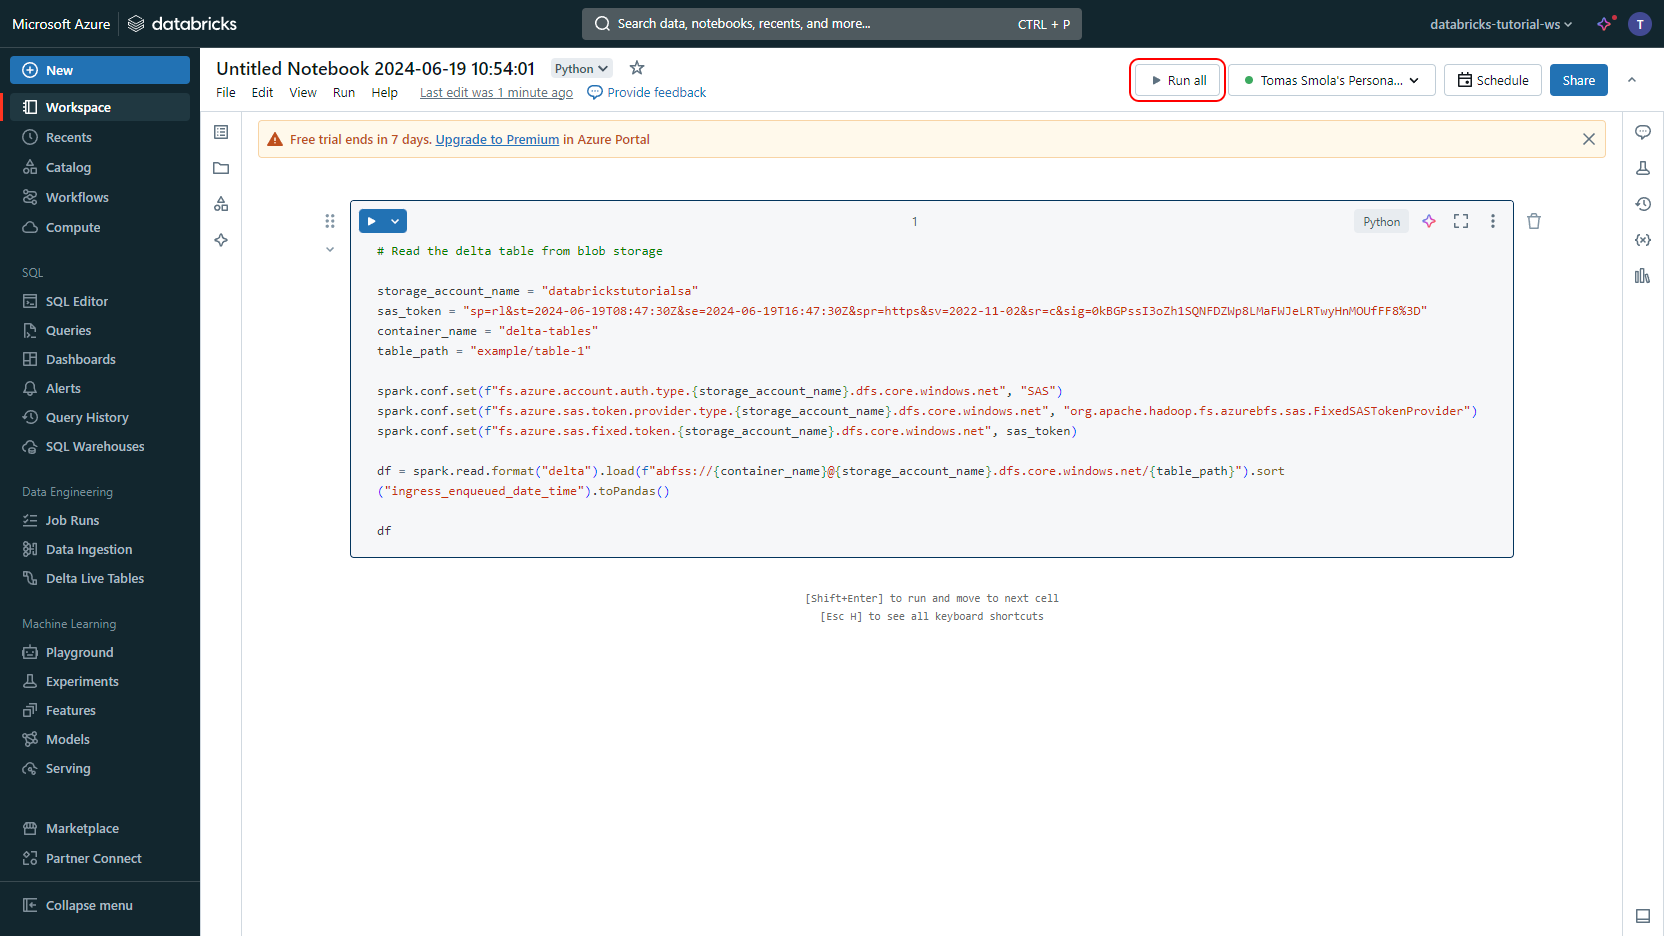
Paste the Python code snippet you copied earlier into the notebook. Replace the placeholders
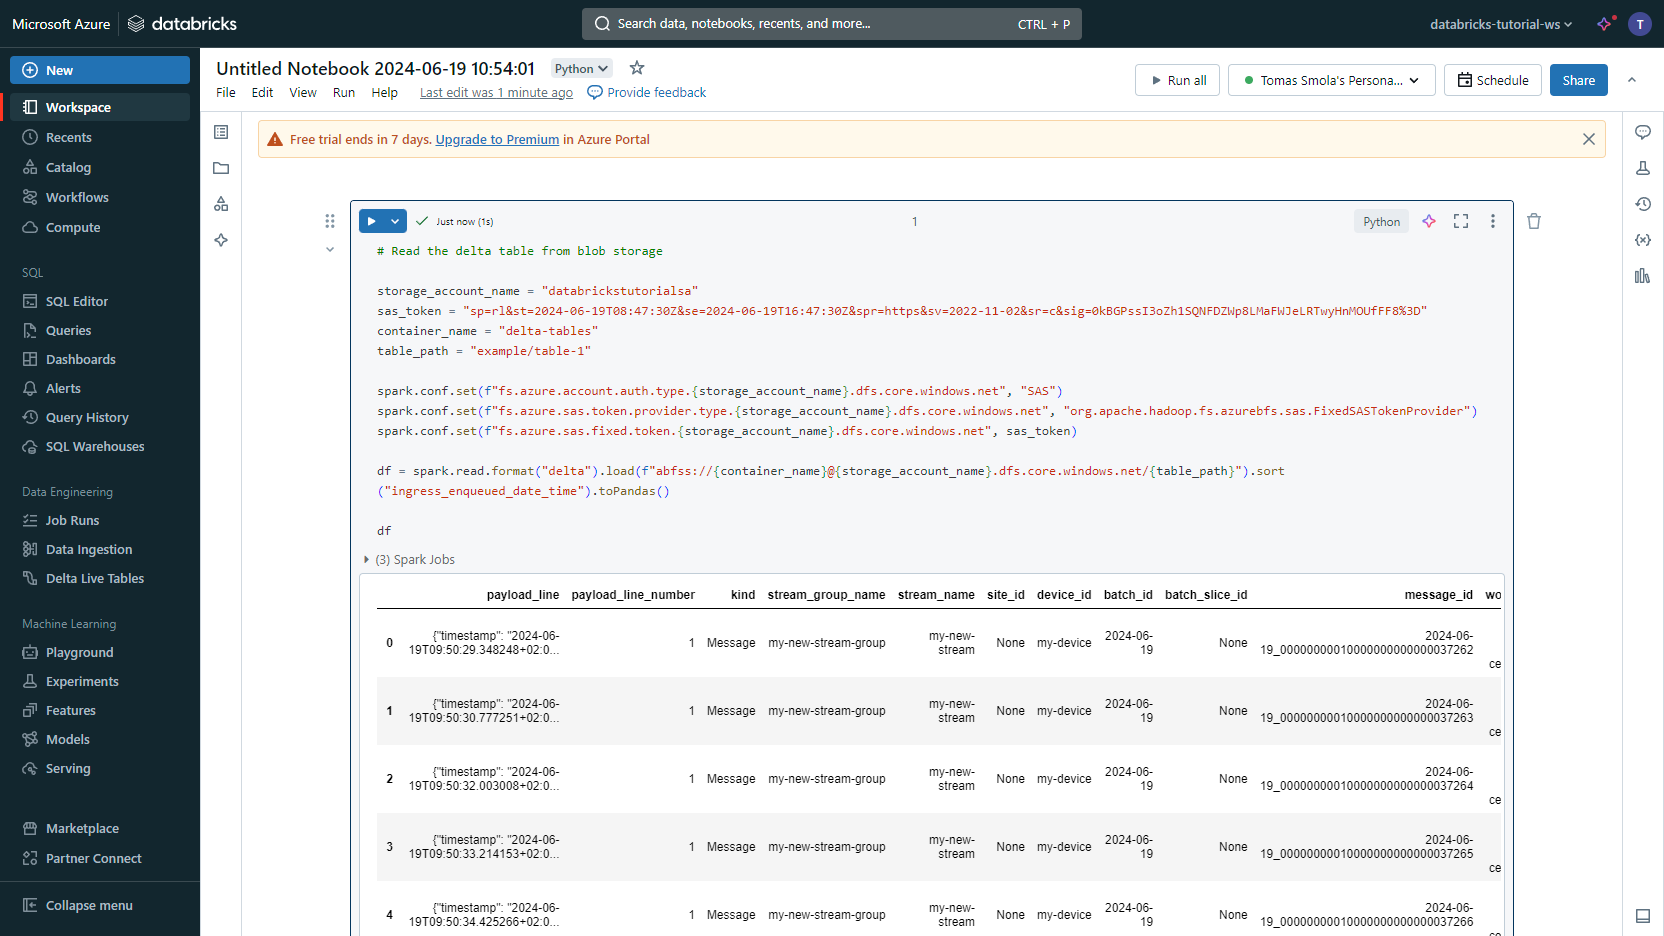
<Your Stroage Account Name>,<Your SAS Token For Your Container>,<Your Container Name>, and<Your Delta Table Directory Path>with the corresponding values. Click Run all.Voilà, you can explore the data.
This short code snippet loads and prints the data from the connected Delta table. You can easily extend the notebook to perform data analysis according to your needs.
Parsing JSON data
If the payload_line column contains a JSON string, it can be simply parsed and used e.g. for filtering.
Suppose that the JSON string in the payload_line column looks like this:
{
  "data": 42
}
Then, following PySpark code can be used to filter on the data property:
# Import functions needed for parsing JSON

from pyspark.sql.functions import from_json

# Load the Delta Table as a PySpark data frame as in the previous example

df = spark.read.format("delta").load(...)

# Add a new column with the parsed JSON

df_with_payload_json = df.withColumn("payload_json", from_json(df.payload_line, "MAP<STRING,INT>"))

# Filter

df_filtered = df_with_payload_json.filter(df_with_payload_json.payload_json.data >= 42)

# Check the result

df_filtered.toPandas()

